by Eddie Arcaro

(Sports Illustrated   Part 4,  "The WHIP"  July 8, 1957)


THE WHIP


    I'd like to repeat that any course of action a rider takes during a race depends, first on the knowledge of what his horse will do and, secondly, on what his opposition is doing. This statement naturally includes the whipping of a horse and in this connection, I have discovered a great misconception on the part of many racing fans about the proper use of the whip.  Many think that when you're flailing away, you're really working. Wrong. When you're whipping a horse, you're actually resting yourself--compared to the effort you put into the hand-ride.  But, unless you know how to whip properly and when your horse needs whipping, you can do your chances much more harm than good.   For example, when a horse tires and shortens stride, the tendency of the inexperienced rider is to draw his whip.  This is wrong, because, hell, if there's one thing a tired horse doesn't need--just as he's beginning to flounder around--it's a whipping.  He needs the help that an expert hand-ride can give him. I've always operated on the theory that I only hit a horse when I absolutely have to--and never to impress the public with how hard I'm working.  As for the criticism that whipping is cruel, I feel that it's very hard to hurt a horse with a whip.  Some jocks cut a horse up a bit, but I don't think that helps him run.  The effect should be a sting. This isn't a painful hurt. Its a sting which should startle him into doing what you want him to do.

CONSTRUCTION

     The shaft (c) of my whips (which I manufacture myself)  has a core of 1/4-inch solid frosted-glass tubing covered with a thread in open weave, then thin rubber tubing covered with tightly woven cotton thread. To taper it, we put on thin layers of packing paper--four  layers at one end, up to 18 layers at the handle (d).  String is tightly cross-woven and lacquered to form the outside covering.  Heavy cord forms a knot at the handle, with rubber tape (e) as a grip and a heavy knot at top (f).  The squared popper (a) must be at least two inches long and, like the feathers (b) under it, is made of soft leather and secured with heavy thread. I always add tape to the handle to get the proper "feel" (much  as you would the grip of a golf club) but, amazing as it may seem, when you get all through putting together this 27.5" whip,  the whole thing weighs only 4 ounces.  But it can do the job, though!

THE WHIP: SWITCH HITTING

     Like most jocks, I whip right-handed most of the time, although I think we'd all get better results, if we disciplined ourselves to whip left-handed about 50% of the time. Day-to-day, race-to-race, you find yourself really handicapped, if you can't whip on both sides.  If you're head-and-head and the horse on the right is leaning against you and you don't know how to switch the whip--it's just like giving up.  You simply haven't got a chance.

WHIP UNCOCKED

Because you are not allowed to cock your whip in the starting gate, you look like this on the break--with the feathers and leather popper pointing vertically downward and the whip held by one finger and the reins by three.  In some races, I might never cock my whip. This seldom happens, though, and generally when you're ready to move or drive your horse, it's a natural reaction to cock it--where you can have it ready for immediate use.
TWIRLING THE WHIP

Bringing the whip from the uncocked to the cocked position is done by letting go of the rein with the right hand and with all fingers working, the whip is twirled so that it is up-ended  (below drawing).  This is one of those purely reflex actions which you just do without ever quite knowing when you do it.  Some jocks--even some very experienced ones--use a rubber band around their forefinger and the lower part of their whip (see drawing below) so they won't lose it when twirling it.   I find the two ways in which you're most apt to lose a whip  (and my average isn't too bad: usually two lost whips in about 1000 rides a year) are twirling it when you're apt to be clumsy after a long layoff--or accidentally hitting another horse.
WHIP COCKED

By the time you finish twirling the whip you wind up with it in the cocked position and ready to use.  And, whereas in the uncocked position, I held it with only one finger, I'm now very likely to grasp it with two fingers a few inches below the knob. Use of the extra finger just gives me a little better control of the whip within my hand. Now, when you take the first stroke, you will also feel if the whip is striking properly or not.  And if it doesn't feel right, you'll sort of automatically rotate the shaft in your hand so as to hit squarely, making sure you strike him with the popper flat.
WHIPPING STYLES

You hit a horse differently, depending upon the circumstances in which you find yourself.  Sometimes, it is because of a possible surprising effect, but more often it is because it's the only logical way. For example, at the right, where just out of the gate, I want position and while still holding the whip uncocked, I 'd pelt his rump with my thumb up, because there was no time to cock the whip.

Under Girth (A)

If I hit a horse on the rump and haven't gotten him to moving, I'll often try a vertical stroke back over my right foot--straight down--so the whip catches him in the belly right under the girth.  Another time, the belly shot might help is in a tight finish when a whack might make him flinch just enough to get the nod.

Fanning (B)

Early in the race, if you have the whip uncocked going around a turn, you might hit a horse on the shoulder--sort of flip him if he's trying to run-out.  Again, at the finish, I'll often wave the whip just off the side of his head in a sort of fanning motion which instead of making actual contact with his body, just makes him conscious that the whip is close by.

On the Rump  (C)

The proper place to hit a horse is on the rump, but above the flank.  A lot of horses hit in the flank will sulk.  It's real tough to hit a horse properly on his rump, because you must get our arm back there and still have sufficient power to hit with.  Sometimes, I'll fan a horse's rump, which a lot of times in a sulking horse gets the job done better than hitting him.  It looks wicked--but there wont be a mark on him.


TO WHIP OR NOT TO WHIP?

All this talk about whipping--how you whip, when you whip and where you whip--naturally brings up a pretty important question:  Does every horse have to be whipped?  I'd  say, by all means, no.  As long as your horse is running for you, why hit him?  A lot of the times, I'll finish all through the stretch ready to hit my  horse but wont ever touch him.  I'll swish that whip off his ear just to frighten him enough.  He knows its there. I always remember two truths: 

1) many horses will run better without you whipping them,
2)  many horses will cringe when you hit them and you get the opposite reaction from what you want.

Only your own individual experience will teach you what is best for each animal.  My points here, however, are that whipping often can win races for you and that the ability to whip with either hand gives you an advantage over the jockey only able to whip with one. My own ability to whip left-handed was to a great extent the result of an accident when I dislocated my right shoulder about the time I was riding Citation.  It forced me to perfect my left-handed whipping.  Because I was riding Citation, the best horse in America at the time, of course, I didn't want to tell anybody my trouble, but for nearly a year, I couldn't raise my right arm and even now only at the height of summer--when I'm real loose--can I get my right arm up high.  As as rule, the arc of my right stroke is much lower than my left.  But now, for an example of the need for switch hitting, lets return to our theoretical mile race in which we saw (on  last weeks article, part 3) how my #2 horse was about to take the rail spot at the quarter pole and is now locked in a duel with the contending # 4-horse and # 8-horse.

THE 3-HORSE SQUEEZE
(below drawing)

In the story of our race, I have moved inside the #4-horse on the rail.  The #4-horse is too tight and I have no whipping room.  The jock on the #8-horse  has plenty of room to whip right-handed. I must go to the whip. but first I must switch the whip from my right to my left hand.
SWITCHING THE WHIP

FIRST STRIDE

(1) One Choice

I can prepare to switch the whip from either of two positions. In the first example, I'm holding the whip firmly in my right hand--cocked--and set to use right-handed, if only I had the whipping room.

(2) Or from here

Another position just before switching would find me in a standard hand-riding movement where you'll see that I have both the rein and whip in my right hand.  From either of these positions, I now start the switch.
3) Shorten Rein

First step in the switch is to reach forward on the right rein with my right hand in order to take ahold of the rein in a shortened position. At the same time, my left hand is holding the other rein tightly.

4) Left Rein Over

To make the right half-cross, I must now bring the left rein over into my right hand--by taking the left rein and bringing it above the horse's neck and then picking up the left rein with my right hand.
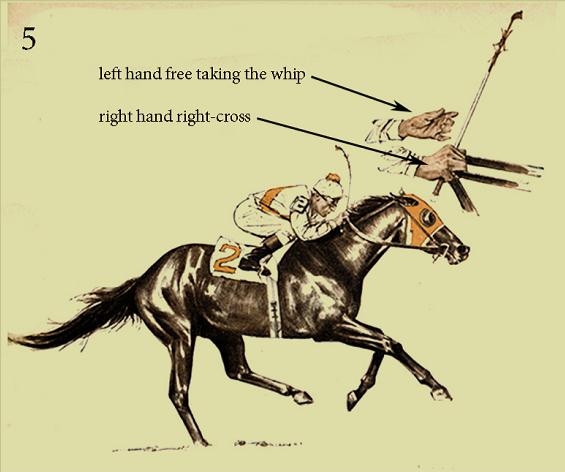
SWITCHING THE WHIP
during the 2nd stride

5) The Left Moves


I now have a half-cross with complete control of my horse in my right hand.  My left  hand which has already taken the extra left rein out of the way, comes forward to take the whip from the right hand.
6)  There It Goes

Without losing control of the cross or the grip on the reins with the right hand--I loosen  the right hand just barely enough so that the left hand is now able to reach down and pluck the whip free.
7) Whip Secure

By now, I have the half-cross in my right hand and the whip firmly in my left hand and cocked for the first stroke.  As you can see by these drawings, the complete switch came within just two full strides.
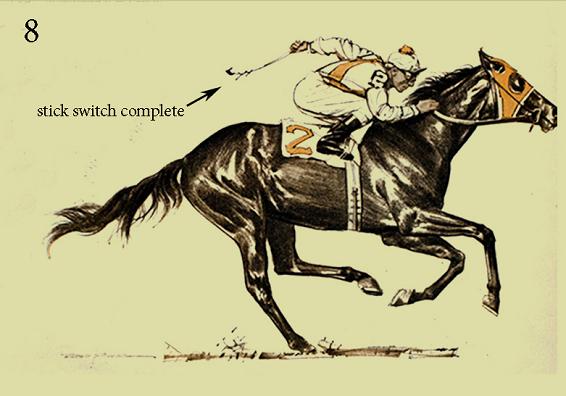
8)  Switch Complete

I am now ready to whip left-handed. The switch is difficult to explain for a number of reasons.  One is that--for me, at least--the whole procedure is one continuous motion and when I'm doing it, I'm not conscious of exactly what I do.  Another reason is that while I'm switching the whip, I'm never as aware of the mechanics of actually switching it as I am of two other very vital things:

1) maintaining control of the horse with the hand in which I hold the half-cross,
2) looking straight ahead.

I'll never allow myself, even for a split second, to look down at what my hands are doing.  Most riders today are pretty good at switching the whip, although a few old-timers who never learned it as kids haven't bothered to learn since.  The difficulty in teaching it to kids is that their first reaction is to freeze on the right hand so they can't get the whip out.  Often they're liable to lose everything--reins and all.  With practice, they should acquire a touch delicate enough to control the reins and still permit the whip to slip instantly free.
HEADING FOR HOME


Having completed the switching of the whip from the right to the left--a move that became immediately necessary once I found myself able to move inside the #4-horse and #8-horse at the quarter pole--I am now in good position for the drive home.  I have whipping room on my inside and if I can draw away from the #4-horse, I'll be free to whip with either hand or better yet, ready for a hand-ride finish.


Part 5   The Finish

I've often been asked about my tactics and my thinking from the eighth pole to the wire.  The answer is simple: get there first.  And the best way is to get down with the maximum effort in an all-out concentration of pushing with the horse so that you both work together.  This is the hand-ride.
Heading for home (#2) with the left-hand whip  switch completed.